Our Blog

How to Create Multi-Container Docker Setup

How to Create Multi-Container Docker Setup

Modern applications rarely consist of a single production server. What you ship to production is a small system: a few stateless compute nodes, a managed database, a queue for async work, and object storage for blobs and artifacts.

Creating a production-like environment on a local machine is not trivial. In most teams, it usually goes one of two ways.

Option 1: Developers build a monolithic application that mimics production functionality. While it may replicate some business logic, it doesn’t truly reflect the distributed nature of the real production environment. As a result, everything appears to work perfectly on the developer’s machine—until deployment. That’s when issues surface: configuration mismatches, networking problems, concurrency bugs, queue behavior differences, and other distributed system challenges that were never exposed locally.

Option 2: The organization provisions a separate cloud environment for each developer group or team. While this approach is closer to production, it quickly becomes impractical from both a management and cost perspective. Maintaining multiple environments increases operational overhead, complicates governance, and significantly raises cloud expenses.

Neither approach is ideal. What we really need is a way to simulate production architecture locally—without sacrificing realism or driving up infrastructure costs.

Typically, “local dev” just means turning a distributed system into one big app: one process, one database, no queues, no Cloud-Blob-style storage, and no multiple nodes running at once. It feels fine while you’re coding… right up until you deploy. Then Cloud introduces all the stuff your local setup never showed you, like:

  - eventual consistency and timing edge-cases

  - auth/permissions behavior (IAM-like failures, missing policies, wrong creds)

  - queue semantics (visibility timeouts, redeliveries, ordering assumptions)

  - retry storms and idempotency bugs

  - race conditions that only appear when 3 instances are running concurrently

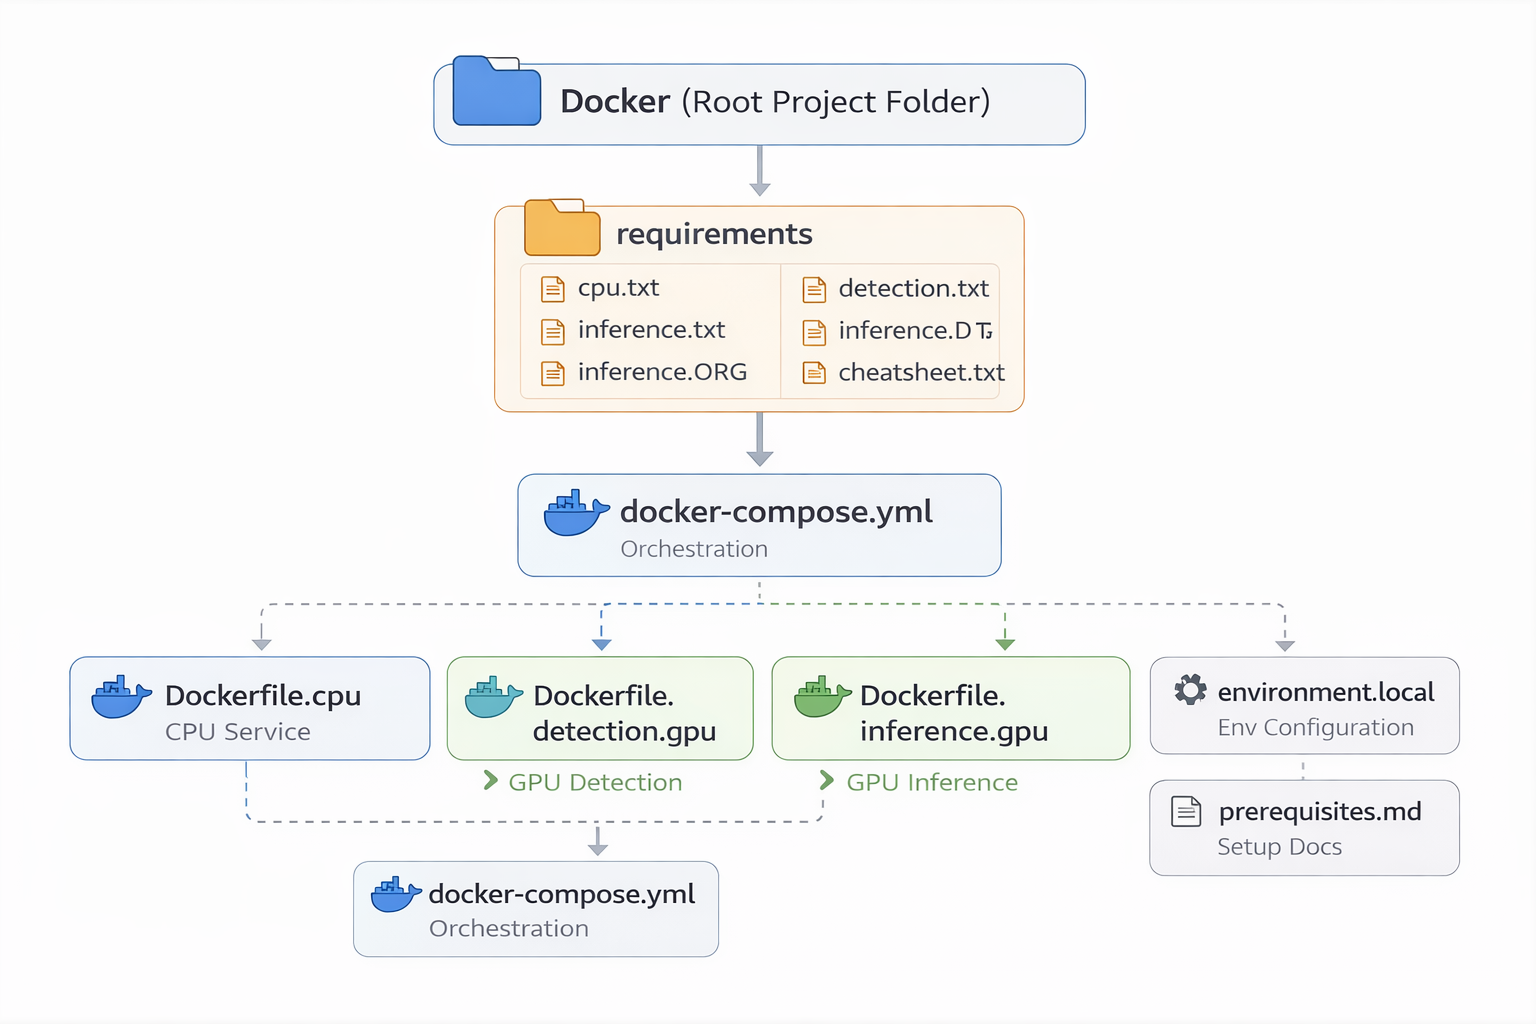
In this blog post, we’ll build a multi-container Docker environment that depicts a production-style architecture. The setup will include:

  - A dedicated frontend container

  - A GPU-powered detection and inference service (CUDA-enabled)

  - A PostgreSQL database container

  - A file storage container

  - A Redis container for queuing and background jobs

Each service runs in its own isolated container, communicating over a shared Docker network—just like independently deployed services in production.

Key Terms Used

Docker
is a platform for packaging and running applications in isolated environments called containers. It standardizes runtime dependencies so “it works on my machine” becomes “it works everywhere”.

Container
A container is a running instance of an image. It offers faster start up times as compared to VMs. You can think of them as "lightweight VMs". But they share the host OS Kernel. A container includes:

  - your app + dependencies

  - isolated filesystem/processes/networking

  - A file storage container

  - A file storage container

Image
A Docker image is a blueprint (read-only template) for creating containers. Images are built from a Dockerfile and typically include:

  - OS base (e.g., ubuntu, alpine)

  - runtime (Python/Node/Java/.NET)

  - your application code (or a mount for dev)

Cheat Sheet - Common Docker Commands

Basics

  - docker version: Check docker version

  - docker ps / docker ps -a: Check running/all containers

  - docker images: List docker images

  - docker version: Check docker version

  - docker logs <container>: Get docker container logs

  - docker exec -it <container> /bin/bash: Access container's shell

Run and Build

  - docker version: Check docker version

  - docker version: Check docker version

  - docker build -t myapp:dev: build an image

  - docker run --rm -it myapp:dev: run an image as a container (temporary)

Cleanup

  - docker stop <container>: Stop running container

  - docker rm <container>: Remove docker container

  - docker rmi <image>: Remove docker image

  - docker system prune: remove unused resources (use carefully)

Compose (multi-container)

  - docker compose up -d <image>: start all services

  - docker compose down <image>: stop and remove services

  - docker compose logs -f <image>: tail logs

  - docker compose exec bash <image>: shell into a service

  - docker compose build: rebuild images

Prerequisites Software

For the purpose of this tutorial, the code is tested on an Ubuntu 24.04 machine running NVIDIA GPU 4070.

Setup CUDA Toolkit

Visit the CUDA downloads page Download CUDA Toolkit. You will be presented with the following screen (where you can select your OS).

CUDA Toolkit downloads page

Once you have selected an appropriate OS (in our case Linux and Ubuntu 24.04's .deb page), you will be redirected to the appropriate download link

Copy the download link and open a terminal window. Type following command to download it. wget https://developer.download.nvidia.com/compute/cuda/repos/ubuntu2404/x86_64/cuda-keyring_1.1-1_all.deb

Now install it using the following commands: sudo dpkg -i cuda-keyring_1.1-1_all.deb sudo apt-get update sudo apt-get -y install cuda-toolkit-13-1

Install Nvidia Drivers
Next, install the NVIDIA Drivers (if not already installed on your machine)
sudo apt install -y ubuntu-drivers-common sudo ubuntu-drivers autoinstall

Restart your machine sudo reboot Once your device has successfully reboot. Reopen the terminal and run following commands to complete the toolkit installation: apt install nvidia-cuda-toolkit Confirm the installation by running following command in the terminal: which nvcc nvcc --version

Install CUDA Container Toolkit
In order to provide GPU functionality to Docker containers we need to install toolkit for CUDA compatible container. Use following command to install it: sudo apt-get install -y nvidia-container-toolkit

Install Docker on your System
Use following commands to install Docker on your machine: sudo apt install ca-certificates curl sudo install -m 0755 -d /etc/apt/keyrings sudo curl -fsSL https://download.docker.com/linux/ubuntu/gpg -o /etc/apt/keyrings/docker.asc sudo chmod a+r /etc/apt/keyrings/docker.asc Now add the repository to APT sources: sudo tee /etc/apt/sources.list.d/docker.sources <<EOF Types: deb URIs: https://download.docker.com/linux/ubuntu Suites: $(. /etc/os-release && echo "${UBUNTU_CODENAME:-$VERSION_CODENAME}") Components: stable Signed-By: /etc/apt/keyrings/docker.asc EOF sudo apt update sudo apt install docker-ce docker-ce-cli containerd.io docker-buildx-plugin docker-compose-plugin Check if Docker is running correctly: sudo systemctl status docker

Install Docker Compose
Use following command to install Docker Compose: apt install docker-compose

Target Local Docker Structure

In order to successfully replicate production environment on the local Docker container set we need to have following structure:

  + Frontend Container - For running the web application. No GPU powered

  + Detection Container - For running Yolo-v9 model. GPU Powered

  + Inference Container - For running Qwen/Qwen2.5-VL-7B-Instruct model. GPU powered

  + Files Container - For simulating S3 functionality

  + Redis Container - For simulating SQS functionality

Proposed Docker File Hierarchy
Please review the diagram below: Docker File Hierarchy

In above diagram, we have following main components:

  1. Requirements Folder: This folder contains the requirements.txt for three containers - namely: frontend, detection and inference component

  2. Docker-Compose YAML: is a configuration file used to define and run multiple Docker containers together as one application. Instead of starting containers one-by-one using many Docker commands, docker-compose lets you describe everything in one file, such as:

    - which containers to run

    - how they connect to each other

    - ports to expose

    - environment variables

    - volumes and networks

  3. DockerFile for CPU: The Dockerfile starts from an Ubuntu 24.04 base image and installs the required system tools along with Python. It then creates a dedicated Python virtual environment and installs all necessary dependencies from the requirements/cpu.txt file. The configuration proceeds by cloning the frontend repository via SSH into the /app directory and copying the environment.local file into the container image for runtime configuration. A startup script is added to execute python3 /app/app.py when the container launches, and finally, port 5000 is exposed while defining the default container startup command (CMD).

  4. DockerFile for Detection: This Dockerfile builds a GPU-enabled detection container starting from nvidia/cuda:13.1.0-runtime-ubuntu24.04, sets up the CUDA environment variables, and creates a dedicated Python virtual environment under /opt/venv (added to PATH). It installs required system packages including Python tooling, Git/SSH utilities, FFmpeg, and common runtime libraries needed for CV/ML workloads. The image then prepares SSH known hosts for GitHub and clones the detection repository into /app using BuildKit SSH forwarding (configurable via build args for repo and branch). It copies environment.local into /app/environment.local, pulls an additional StrongSORT/YOLOv9 tracking repository into /app/mot_strongsort, and installs Python dependencies from /app/requirements/detection.txt (or falls back to /app/requirements.txt if needed). Finally, it creates a startup script that launches detection_main.py plus two ARQ workers (detection pipeline and break_files) in parallel, monitors them, and sets that script as the container’s default CMD.

  4. DockerFile for Inference: This Dockerfile builds a GPU-enabled inference container starting from nvidia/cuda:13.1.0-runtime-ubuntu24.04, sets CUDA-related environment variables, and creates a dedicated Python virtual environment in /opt/venv (added to PATH so activation isn’t needed). It installs core system packages (Python tooling, Git/SSH, and required runtime libraries for CV/ML), trusts GitHub’s SSH host key, then clones the inference repository into /app using BuildKit SSH forwarding (with build args to control repo and branch). It copies environment.local into /app/environment.local, installs Python dependencies from /app/requirements/inference.txt (falling back to /app/requirements.txt if needed), and then enforces specific “known-good” ML package versions by reinstalling key libraries and installing PyTorch components (via the CUDA wheel index) plus pinned transformers/tokenizers, verifying imports at build time. Finally, it creates a startup script that launches inference_main.py and an ARQ inference worker together, monitors both processes, and sets that script as the container’s default CMD.

  5. Environment.Local: The environment.local file is a centralized set of runtime environment variables used by your containers to configure authentication, AWS integrations, networking, and service connectivity.

  6. Prerequisites.md: The documentation for setup.

Code files for requirements.txt

1. Requirements for CPU Container
: Filename: requirements/cpu.txt Flask>=2.0.1 Werkzeug>=2.0.1 itsdangerous>=2.0.1 python-dotenv>=0.19.0 Flask-CORS>=3.0.10 flask-socketio>=5.3.6 eventlet>=0.33.0 Flask-SQLAlchemy>=2.5.1 Flask-Migrate>=4.0.4 SQLAlchemy>=1.4.0 psycopg2-binary redis>=5.0.0 requests>=2.23.0 email-validator>=1.1.3 boto3 Authlib

2. Requirements for Detection Container (GPU Powered)
: Filename: requirements/detection.txt python-dotenv==1.0.1 # Video / media ffmpeg-python==0.2.0 # Queue / async workers (Redis-backed) arq==0.25.0 # Database (Postgres) SQLAlchemy==2.0.29 psycopg2-binary==2.9.9 # Core ML / CV numpy>=1.18.5 Pillow>=7.1.2 opencv-python>=4.1.2 # GPU deep learning (installed with CUDA wheels in Docker build/runtime) torch>=1.7.0 torchvision>=0.8.1 # Detection / tracking utilities ultralytics filterpy>=1.4.5 albumentations>=1.0.3 torchreid # Optional: debugging/telemetry & dev tools (remove if not needed) tensorboard>=2.4.1 websocket-client

3. Requirements for Inference Container (GPU Powered)
: Filename: requirements/inference.txt # HuggingFace / LLM training & inference trl>=0.8.6 transformers==5.2.0 tokenizers>=0.20.0 accelerate>=0.30.1 peft>=0.11.1 datasets==2.19.1 evaluate # Environment configuration python-dotenv # Async workers / queue arq # Image handling Pillow # Database (local container Postgres) SQLAlchemy psycopg2-binary

Code files for DockerFile

1. Dockerfile.cpu
: Filename: DockerFile.cpu # syntax=docker/dockerfile:1.4 FROM ubuntu:24.04 ENV DEBIAN_FRONTEND=noninteractive RUN apt-get update && apt-get install -y --no-install-recommends \ ca-certificates curl \ bash \ python3 python3-pip python3-venv python-is-python3 \ git openssh-client \ && rm -rf /var/lib/apt/lists/* # PEP 668 safe: use venv ENV VENV_PATH=/opt/venv ENV PATH="${VENV_PATH}/bin:${PATH}" RUN python3 -m venv ${VENV_PATH} \ && pip install --upgrade pip setuptools wheel # GitHub trust (avoid interactive prompt) RUN mkdir -p /root/.ssh && chmod 700 /root/.ssh \ && ssh-keyscan github.com >> /root/.ssh/known_hosts # ---- Clone frontend repo (blog-safe placeholders) ---- ARG [email protected]:YOUR_ORG/YOUR_REPO.git ARG FRONTEND_BRANCH=main WORKDIR /app # Uses BuildKit SSH forwarding (no keys baked into image) RUN --mount=type=ssh git clone --depth 1 -b ${FRONTEND_BRANCH} ${FRONTEND_REPO_SSH} /app # ---- Install Python deps ---- COPY requirements/cpu.txt /tmp/requirements.txt RUN pip install --no-cache-dir -r /tmp/requirements.txt # NOTE (security): Do NOT bake env files into the image. # Provide env vars at runtime via: # docker run --env-file environment.local ... # or docker-compose: env_file: [environment.local] # Start script (keep logs clean; no repo file listing) RUN tee /usr/local/bin/start-cpu.sh > /dev/null <<'SH' #!/usr/bin/env bash set -euo pipefail echo "Starting CPU service..." echo "Python: $(python3 --version)" exec python3 /app/app.py SH RUN chmod +x /usr/local/bin/start-cpu.sh EXPOSE 5000 CMD ["/usr/local/bin/start-cpu.sh"]

2. Dockerfile.detection.gpu
: Filename: DockerFile.detection.gpu # syntax=docker/dockerfile:1.4 FROM nvidia/cuda:13.1.0-runtime-ubuntu24.04 ENV DEBIAN_FRONTEND=noninteractive # CUDA env ENV CUDA_HOME=/usr/local/cuda ENV LD_LIBRARY_PATH="${CUDA_HOME}/targets/x86_64-linux/lib:${CUDA_HOME}/lib64:${LD_LIBRARY_PATH}" # Python venv (PEP 668 safe) ENV VENV_PATH=/opt/venv ENV PATH="${VENV_PATH}/bin:${CUDA_HOME}/bin:${PATH}" RUN apt-get update && apt-get install -y --no-install-recommends \ ca-certificates curl bash \ python3 python3-pip python3-venv python-is-python3 \ git openssh-client \ ffmpeg \ libglib2.0-0 libgl1 libsm6 libxext6 libxrender1 libxcb1 \ && rm -rf /var/lib/apt/lists/* # Create venv BEFORE pip installs RUN python3 -m venv ${VENV_PATH} \ && pip install --upgrade pip setuptools wheel # Trust GitHub host key (avoid interactive prompt) RUN mkdir -p /root/.ssh && chmod 700 /root/.ssh \ && ssh-keyscan github.com >> /root/.ssh/known_hosts # ---- Clone repo (blog-safe placeholders) ---- # Use BuildKit SSH forwarding: docker build --ssh default . ARG [email protected]:YOUR_ORG/YOUR_DETECTION_REPO.git ARG DETECTION_BRANCH=main WORKDIR /app RUN --mount=type=ssh git clone --depth 1 -b ${DETECTION_BRANCH} ${DETECTION_REPO_SSH} /app # NOTE (security): Do NOT bake env files into the image. # Provide env vars at runtime via: # docker run --env-file environment.local ... # or docker-compose: env_file: [environment.local] # COPY environment.local /app/environment.local # Install requirements (repo-dependent) RUN set -eux; \ if [ -f "/app/requirements/detection.txt" ]; then \ pip install --no-cache-dir -r /app/requirements/detection.txt; \ elif [ -f "/app/requirements.txt" ]; then \ pip install --no-cache-dir -r /app/requirements.txt; \ else \ echo "ERROR: No requirements file found in /app"; \ exit 1; \ fi # Start script RUN tee /usr/local/bin/start-gpu.sh > /dev/null <<'SH' #!/usr/bin/env bash set -euo pipefail echo "[start] launching detection_main.py" python3 detection_main.py & DET_PID=$! wait -n EXIT_CODE=$? echo "[error] one process exited (code=${EXIT_CODE}). Remaining processes:" ps -o pid,cmd -p "${DET_PID}" "${ARQ_DET_PID}" "${ARQ_BREAK_PID}" 2>/dev/null || true exit "${EXIT_CODE}" SH RUN chmod +x /usr/local/bin/start-gpu.sh CMD ["/usr/local/bin/start-gpu.sh"]

3. Dockerfile.inference.gpu
: Filename: DockerFile.inference.gpu # syntax=docker/dockerfile:1.4 FROM nvidia/cuda:13.1.0-runtime-ubuntu24.04 ENV DEBIAN_FRONTEND=noninteractive # CUDA env ENV CUDA_HOME=/usr/local/cuda ENV LD_LIBRARY_PATH="${CUDA_HOME}/targets/x86_64-linux/lib:${CUDA_HOME}/lib64:${LD_LIBRARY_PATH}" # Python venv (PEP 668 safe) ENV VENV_PATH=/opt/venv ENV PATH="${VENV_PATH}/bin:${CUDA_HOME}/bin:${PATH}" RUN apt-get update && apt-get install -y --no-install-recommends \ ca-certificates curl bash \ python3 python3-pip python3-venv python-is-python3 \ git openssh-client \ ffmpeg \ libglib2.0-0 libgl1 libsm6 libxext6 libxrender1 libxcb1 \ && rm -rf /var/lib/apt/lists/* # Create venv BEFORE pip installs RUN python3 -m venv ${VENV_PATH} \ && pip install --upgrade pip setuptools wheel # Trust GitHub host key (avoid interactive prompt) RUN mkdir -p /root/.ssh && chmod 700 /root/.ssh \ && ssh-keyscan github.com >> /root/.ssh/known_hosts # ---- Clone repo (blog-safe placeholders) ---- # Use BuildKit SSH forwarding: docker build --ssh default . ARG [email protected]:YOUR_ORG/YOUR_INFERENCE_REPO.git ARG INFERENCE_BRANCH=main WORKDIR /app RUN --mount=type=ssh git clone --depth 1 -b ${INFERENCE_BRANCH} ${INFERENCE_REPO_SSH} /app # NOTE (security): Do NOT bake env files into the image. # Provide env vars at runtime via: # docker run --env-file environment.local ... # or docker-compose: env_file: [environment.local] # COPY environment.local /app/environment.local # Install requirements (repo-dependent) RUN set -eux; \ if [ -f "/app/requirements/inference.txt" ]; then \ pip install --no-cache-dir -r /app/requirements/inference.txt; \ elif [ -f "/app/requirements.txt" ]; then \ pip install --no-cache-dir -r /app/requirements.txt; \ else \ echo "ERROR: No requirements file found in /app"; \ exit 1; \ fi # Optional (GPU best practice): # Install torch/torchvision/torchaudio using CUDA wheels in the Docker build # Uncomment and set the index URL that matches your CUDA version if needed. # ARG TORCH_INDEX_URL="https://download.pytorch.org/whl/cu121" # RUN pip install --no-cache-dir torch torchvision torchaudio --index-url ${TORCH_INDEX_URL} # Start script RUN tee /usr/local/bin/start-inference-gpu.sh > /dev/null <<'SH' #!/usr/bin/env bash set -euo pipefail echo "[start] launching inference_main.py" python3 inference_main.py & INF_PID=$! wait -n EXIT_CODE=$? echo "[error] one process exited (code=${EXIT_CODE}). Remaining processes:" ps -o pid,cmd -p "${INF_PID}" "${ARQ_INF_PID}" 2>/dev/null || true exit "${EXIT_CODE}" SH RUN chmod +x /usr/local/bin/start-inference-gpu.sh CMD ["/usr/local/bin/start-inference-gpu.sh"]

4. docker-compose.yml
: Filename: docker-compose.yml services: postgres: image: postgres:16.11 environment: POSTGRES_USER: postgres POSTGRES_PASSWORD: postgres POSTGRES_DB: appdb ports: - "5432:5432" volumes: - pgdata:/var/lib/postgresql/data redis: image: redis:7-alpine env_file: [environment.local] command: ["redis-server", "--requirepass", "${STATUS_REDIS_PWD}"] ports: - "6379:6379" volumes: - redisdata:/data files: image: nginx:alpine env_file: [environment.local] volumes: - shared_uploads:/usr/share/nginx/html:ro ports: - "8000:80" cpu_service: build: context: . dockerfile: ./Dockerfile.cpu ssh: - default args: FRONTEND_REPO_SSH: "[email protected]:YOUR_ORG/YOUR_FRONTEND_REPO.git" FRONTEND_BRANCH: "main" env_file: [environment.local] environment: STATUS_REDIS_IP: redis STATUS_REDIS_PORT: "6379" depends_on: - postgres - redis volumes: - shared_uploads:/data/uploads - /path/to/local/frontend:/app:rw ports: - "5000:5000" detection_gpu: build: context: . dockerfile: ./Dockerfile.detection.gpu ssh: - default args: DETECTION_REPO_SSH: "[email protected]:YOUR_ORG/YOUR_DETECTION_REPO.git" DETECTION_BRANCH: "main" env_file: [environment.local] environment: STATUS_REDIS_IP: redis STATUS_REDIS_PORT: "6379" depends_on: - postgres - redis volumes: - shared_uploads:/data/uploads gpus: all inference_gpu: build: context: . dockerfile: ./Dockerfile.inference.gpu ssh: - default args: INFERENCE_REPO_SSH: "[email protected]:YOUR_ORG/YOUR_INFERENCE_REPO.git" INFERENCE_BRANCH: "main" env_file: [environment.local] environment: STATUS_REDIS_IP: redis STATUS_REDIS_PORT: "6379" depends_on: - postgres - redis volumes: - shared_uploads:/data/uploads - /path/to/local/inference:/app:rw gpus: all volumes: pgdata: shared_uploads: redisdata:

How to Start/Stop All Containers

Once you have completed all of the Docker files / prerequisite software installation, you need to build the containers using the following command: DOCKER_BUILDKIT=1 docker compose build --ssh default

It will take several minutes to build multiple containers on your local laptop. In our case, it took around 9 minutes to build all of the containers. Once all containers have been successfully built, you can start it using the following command: docker compose up

You can verify containers are running by issuing the following command: docker ps Show Docker Containers running

Conclusion

If your organization wants development environments that behave like production—not simplified local setups that break after deployment—the first step is establishing environment parity. This means designing local systems that reflect real operational components such as services, queues, databases, storage layers, and GPU workloads rather than collapsing everything into a single monolithic process.

Next, standardize how infrastructure is defined and deployed. Using containerized, multi-service architectures allows teams to reproduce environments consistently across developer machines, staging systems, and cloud production platforms. This reduces onboarding time, prevents configuration drift, and helps teams detect integration and performance issues much earlier in the development lifecycle.

Finally, treat infrastructure as a repeatable engineering capability, not a one-time setup. By combining Docker-based environments, automated builds, CI/CD pipelines, and clearly defined service boundaries, organizations create platforms that scale with both their applications and their teams. The result is faster delivery, fewer deployment surprises, and development workflows that move smoothly from local machines to production systems without costly rework.

This is exactly where FAMRO LLC can help. Based in the UAE, FAMRO LLC supports organizations in designing and operating production-ready infrastructure, DevOps platforms, and scalable development environments. Our team works hands-on with modern cloud-native tooling, containerized architectures, and GPU-enabled AI workloads—ensuring development environments closely mirror real production systems rather than simplified local setups that fail after deployment.

We begin with a free initial consultation to understand your architecture, delivery workflow, and operational challenges. From there, we help organizations move from fragmented development environments to repeatable, production-aligned platforms built around Docker, cloud infrastructure, CI/CD automation, observability, and secure deployment practices.

  - Flexible deployment

  - Kubernetes-native

  - Strong community adoption

  - Suitable for self-managed environments

FAMRO LLC can support your teams with infrastructure architecture design, multi-container development environments, cloud and GPU workload deployment, DevOps automation, CI/CD implementation, environment standardization, and operational readiness playbooks. Our goal is not just to deploy infrastructure, but to build systems your internal teams can confidently operate, scale, and evolve long after the initial implementation.
🌐 Learn more: Visit Our Homepage
💬 WhatsApp: +971-505-208-240

Our solutions for your business growth

Our services enable clients to grow their business by providing customized technical solutions that improve infrastructure, streamline software development, and enhance project management.

Our technical consultancy and project management services ensure successful project outcomes by reviewing project requirements, gathering business requirements, designing solutions, and managing project plans with resource augmentation for business analyst and project management roles.

Read More
2
Infrastructure / DevOps
3
Project Management
4
Technical Consulting