Setting up Django Project
Please follow these steps to set up the Django Project on your server or local machine.
Step 1: Activate the Virtual Environment
Assuming, you are already logged in to your server, please proceed to the folder where you have created the Python virtual environment:
cd /usr/local/venv
Now activate it using the following command:
source venv/bin/activate
Note: venv is the name of the virtual environment.
Step 2: Browse to the Development Folder
Now browse to the folder where you want to create the Django project. E.g., /usr/local/block-chain-project:
cd /usr/local/block-chain-project
Step 3: Create the Django Project
In this step, you will create the Django Project called project_manager.
Please remember, a Django Project is the overall web application configuration containing settings and multiple apps that work together
django-admin startproject project_manager
Step 4: Create the Django App
Now you will create the Django App called blockchain_sprint_manager.
python3 manage.py startapp blockchain_sprint_manager
A Django app is a modular feature within a larger project, not a standalone microservice. While both promote separation of concerns, a Django app runs within the project and shares resources, whereas a microservice operates independently with its own deployment, database, and API communication. However, Django apps can be refactored into microservices in distributed architectures.
Step 5: Add Custom Templates
We will use custom HTML templates for this project. This helps to illustrate how to add custom HTML files as Django's Template files. First we will need to create folder called templates and nested folder called blockchain_sprint_manager. Ensure you are inside project_manager folder and execute the following code:
mkdir -p templates/blockchain_sprint_manager
Add the reference to the settings file for template as shown below. On your system this will reside in: project_manager/settings.py. Open this file using the following command:
nano project_manager/settings.py
Look for following line in above file:
TEMPLATES = [
{
    'BACKEND': 'django.template.backends.django.DjangoTemplates',
    ...
    ...
}]
Add the following line:
'DIRS': [BASE_DIR / 'templates'], # Enable custom templates
Now TEMPLATES setting would look like:
TEMPLATES = [
  {
      'BACKEND': 'django.template.backends.django.DjangoTemplates',
      'DIRS': [BASE_DIR / 'templates'],  # Enable custom templates
      'APP_DIRS': True,
      'OPTIONS': {
          'context_processors': [
              'django.template.context_processors.request',
              'django.contrib.auth.context_processors.auth',
              'django.contrib.messages.context_processors.messages',
          ],
      },
  },
]
Step 6: Add HTML Text Templates
Let's add some custom templates to capture and show details about the Project and Sprints.
Step 6.1: Add Base Template (base.html)
Create the base template at this path: templates/blockchain_sprint_manager/base.html
<!DOCTYPE html>
<html>
<head>
    <title>{% raw %}{% block title %}Sprint Manager{% endblock %}{% endraw %}</title>
</head>
<body>
    <h1><a href="/">🏁 Sprint Manager</a></h1>
    <hr>
    {% raw %}{% block content %}{% endblock %}{% endraw %}
</body>
</html>
Step 6.2: Add Dashboard Template (dashboard.html)
Create the dashboard template at this path: templates/blockchain_sprint_manager/dashboard.html
<!DOCTYPE html>
<html>
<head>
    <title>Project Dashboard</title>
</head>
<body>
    <h1>Project Dashboard</h1>
    <ul>
        {% raw %}{% for project in projects %}{% endraw %}
            <li>{% raw %}{{ project.project_name }} – {{ project.project_start }}{% endraw %}</li>
        {% raw %}{% empty %}{% endraw %}
            <li>No projects found.</li>
        {% raw %}{% endfor %}{% endraw %}
    </ul>
</body>
</html>
Step 6.3: Add Project Details Template (project_detail.html)
Create the Project Detail template at this path: templates/blockchain_sprint_manager/project_detail.html
{% extends 'blockchain_sprint_manager/base.html' %}
  {% block title %}Project Details{% endblock %}
  {% block content %}
    <h2>{{ project.project_name }}</h2>
    <p><strong>Description:</strong> {{ project.project_description }}</p>
    <p><strong>Start:</strong> {{ project.project_start }}</p>
    <p><strong>End:</strong> {{ project.project_end }}</p>
    <p><strong>Status:</strong> {{ project.completed|yesno:"Completed,In Progress" }}</p>
    <a href="{% url 'project_list' %}">⬅ Back to Projects</a>
{% endblock %}
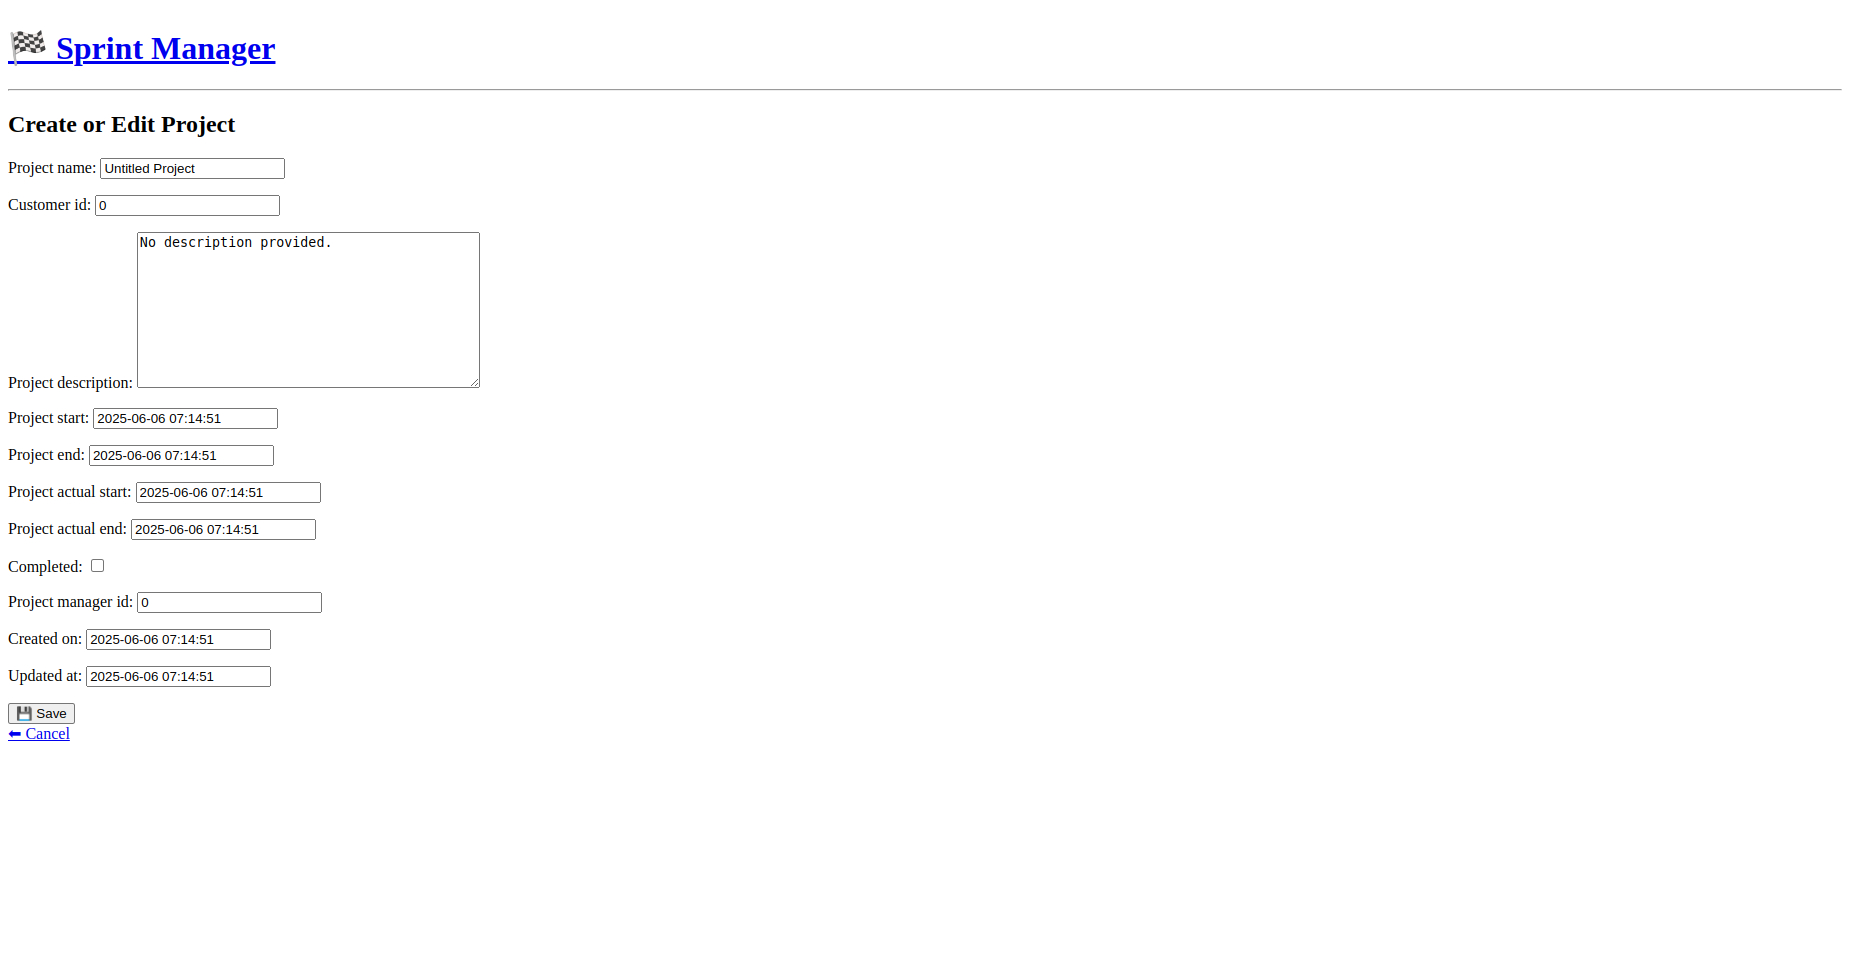
Step 6.4: Add Project Form Template (project_form.html)
Create the Project Form template at this path: templates/blockchain_sprint_manager/project_form.html
{% extends 'blockchain_sprint_manager/base.html' %}
{% block title %}Create/Edit Project{% endblock %}
{% block content %}
<h2>Create or Edit Project</h2>
<form method="post">
    {% csrf_token %}
    {{ form.as_p }}
    <button type="submit">💾 Save</button>
</form>
<a href="{% url 'project_list' %}">⬅ Cancel</a>
{% endblock %}
Step 6.5: Add Project List Template (project_list.html)
Create the Project List template at this path: templates/blockchain_sprint_manager/project_list.html
{% extends 'blockchain_sprint_manager/base.html' %}
{% block title %}Projects{% endblock %}
{% block content %}
<h2>Projects</h2>
<ul>
  {% for project in projects %}
      <li><a href="{% url 'project_detail' project.id %}">{{ project.project_name }}</a></li>
  {% empty %}
      <li>No projects found.</li>
  {% endfor %}
</ul>
<a href="{% url 'project_create' %}">➕ Create New Project</a>
{% endblock %}
Step 6.6: Add Sprint Details Template (sprint_detail.html)
Create the Sprint Detail template at this path: templates/blockchain_sprint_manager/sprint_detail.html
{% extends 'blockchain_sprint_manager/base.html' %}
{% block title %}Sprint Details{% endblock %}
{% block content %}

  <h2>Sprint {{ sprint.id }}</h2>
  <p><strong>Description:</strong> {{ sprint.sprint_description }}</p>
  <p><strong>Start:</strong> {{ sprint.sprint_start }}</p>
  <p><strong>End:</strong> {{ sprint.sprint_end }}</p>
  <p><strong>Progress:</strong> {{ sprint.total_completed }}/{{ sprint.total_items }}</p>
  <a href="{% url 'sprint_list' %}">⬅ Back to Sprints</a>
{% endblock %}
Step 6.7: Add Sprint Details Template (sprint_form.html)
Create the Sprint Form template at this path: templates/blockchain_sprint_manager/sprint_form.html
{% extends 'blockchain_sprint_manager/base.html' %}
<h2>Create or Edit Sprint</h2>
<form method="post">
    {% csrf_token %}
    {{ form.as_p }}
    <button type="submit">💾 Save</button>
</form>
<a href="{% url 'sprint_list' %}">⬅ Cancel</a>
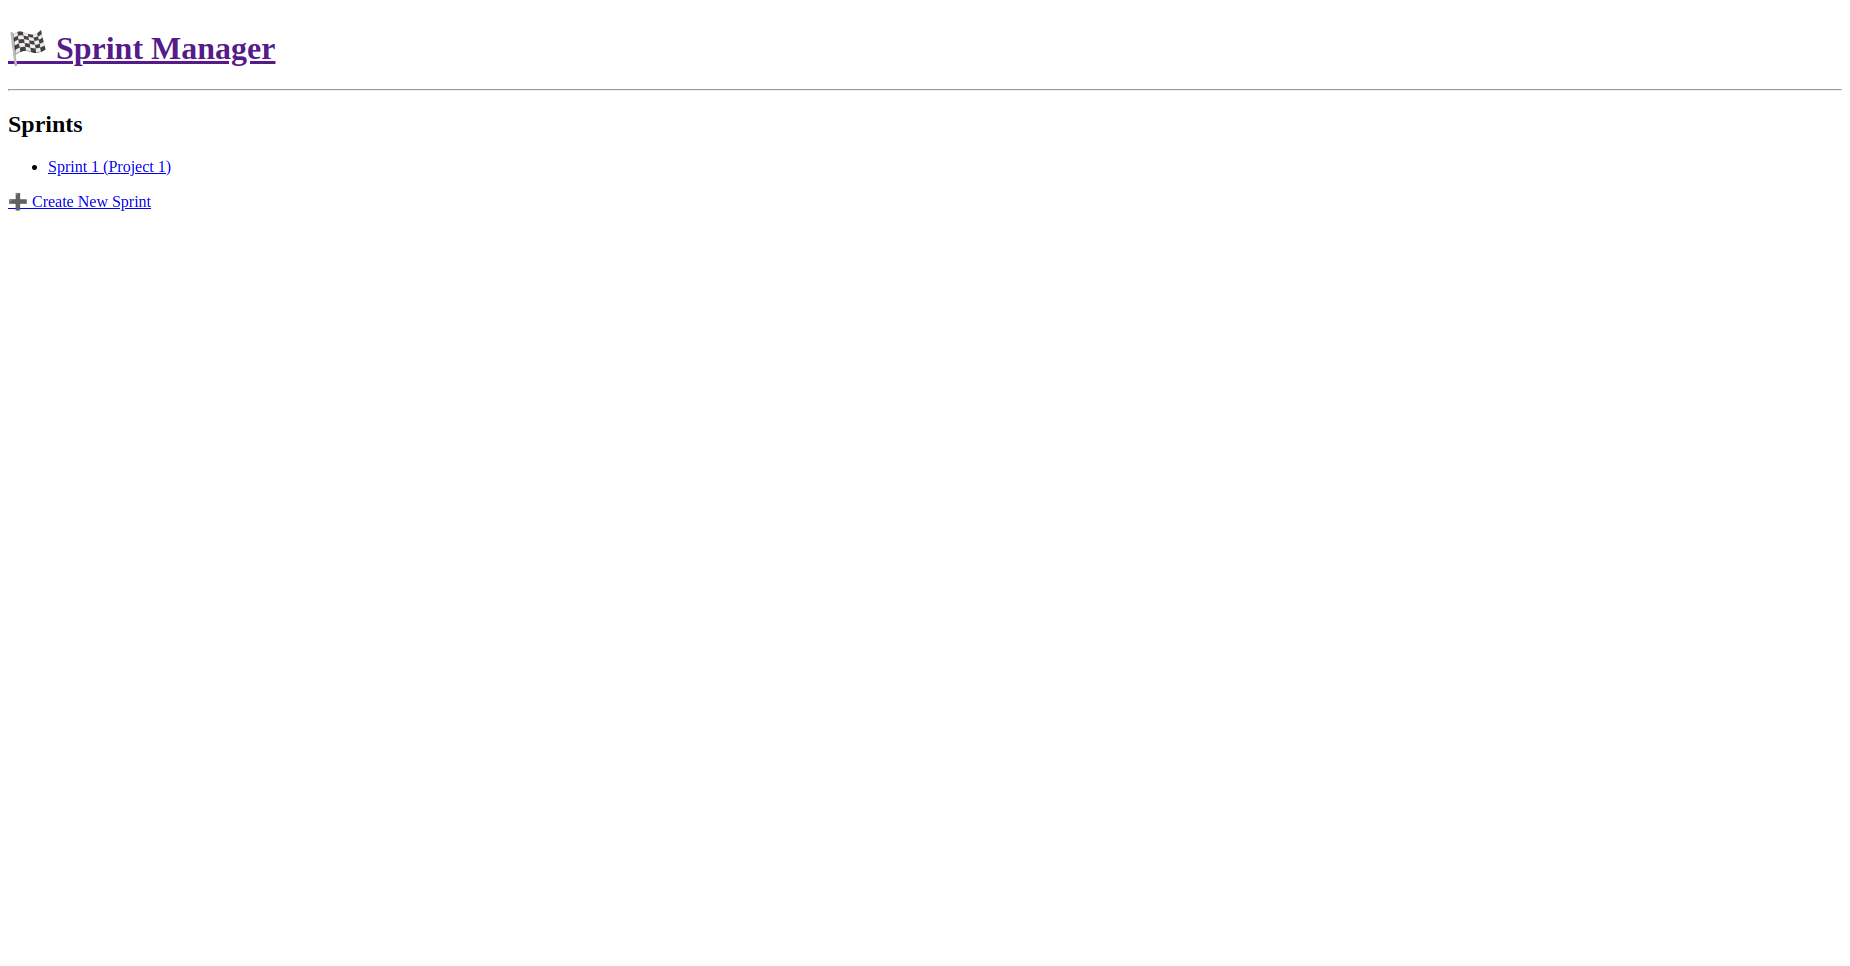
Step 6.8: Sprint List Template (sprint_list.html)
Create the Sprint List template at this path: templates/blockchain_sprint_manager/sprint_list.html
{% extends 'blockchain_sprint_manager/base.html' %}
{% block title %}Sprints{% endblock %}
{% block content %}
<h2>Sprints</h2>
<ul>
  {% for sprint in sprints %}
      <li><a href="{% url 'sprint_detail' sprint.id %}">Sprint {{ sprint.id }} (Project {{ sprint.project_id }})</a></li>
  {% empty %}
      <li>No sprints found.</li>
  {% endfor %}
</ul>
<a href="{% url 'sprint_create' %}">➕ Create New Sprint</a>
{% endblock %}
Step 7: Add Data Models
For this project, we will be capturing information about only two entities: Projects and Sprints. Let's create these two data models as shown below:
Step 7.1: Add Data Model for Project (blockchain_sprint_manager/models.py)
For storing information about the projects, add the following code to (blockchain_sprint_manager/models.py file.
from django.utils import timezone
class Project(models.Model):
    project_name = models.CharField(max_length=255, default='Untitled Project')
    customer_id = models.IntegerField(default=0)
    project_description = models.TextField(default='No description provided.')
    project_start = models.DateTimeField(default=timezone.now)
    project_end = models.DateTimeField(default=timezone.now)
    project_actual_start = models.DateTimeField(default=timezone.now)
    project_actual_end = models.DateTimeField(default=timezone.now)
    completed = models.BooleanField(default=False)
    project_manager_id = models.IntegerField(default=0)
    created_on = models.DateTimeField(default=timezone.now)
    updated_at = models.DateTimeField(default=timezone.now)

    def __str__(self):
        return self.project_name
Step 7.2: Add Data Model for Sprint (blockchain_sprint_manager/models.py)
For storing information about the sprints, add the following code to (blockchain_sprint_manager/models.py file.
class Sprint(models.Model):
  project_id = models.IntegerField(default=0)
  customer_id = models.IntegerField(default=0)
  project_manager_id = models.IntegerField(default=0)
  sprint_start = models.DateTimeField(default=timezone.now)
  sprint_end = models.DateTimeField(default=timezone.now)
  sprint_description = models.TextField(default='No description provided.')
  estimated_hours = models.IntegerField(default=0)
  total_items = models.IntegerField(default=0)
  total_completed = models.IntegerField(default=0)
  created_on = models.DateTimeField(default=timezone.now)
  updated_at = models.DateTimeField(default=timezone.now)

  def __str__(self):
      return f"Sprint {self.id} - Project {self.project_id}"
Step 7.3: Make and executing the migrations
Once you have created the models, please proceed to create the migrations using the following command:
python3 manage.py makemigrations
Next, execute the migrations using the following command:
python3 manage.py migrate
Step 8: Create the Views
Django views are Python functions or classes that handle web requests, process data, and return HTTP responses, typically rendering templates or redirecting users based on application logic. Please open blockchain_sprint_manager/views.py.
nano blockchain_sprint_manager/views.py
Add the following code:
from django.shortcuts import render, get_object_or_404, redirect
from .models import Project, Sprint
from .forms import ProjectForm, SprintForm

# === Project Views ===

def project_list(request):
    projects = Project.objects.all()
    return render(request, 'blockchain_sprint_manager/project_list.html', {'projects': projects})


def project_detail(request, pk):
    project = get_object_or_404(Project, pk=pk)
    return render(request, 'blockchain_sprint_manager/project_detail.html', {'project': project})


def project_create(request):
    if request.method == 'POST':
        form = ProjectForm(request.POST)
        if form.is_valid():
            form.save()
            return redirect('project_list')
    else:
        form = ProjectForm()
    return render(request, 'blockchain_sprint_manager/project_form.html', {'form': form})

# === Sprint Views ===

def sprint_list(request):
    sprints = Sprint.objects.all()
    return render(request, 'blockchain_sprint_manager/sprint_list.html', {'sprints': sprints})

def sprint_detail(request, pk):
    sprint = get_object_or_404(Sprint, pk=pk)
    return render(request, 'blockchain_sprint_manager/sprint_detail.html', {'sprint': sprint})

def sprint_create(request):
    if request.method == 'POST':
        form = SprintForm(request.POST)
        if form.is_valid():
            form.save()
            return redirect('sprint_list')
    else:
        form = SprintForm()
    return render(request, 'blockchain_sprint_manager/sprint_form.html', {'form': form})

def dashboard(request):
    projects = Project.objects.all()
    return render(request, 'blockchain_sprint_manager/dashboard.html', {'projects': projects})
Step 9: Configure the view URLs
Django URLs define the mapping between web request paths and corresponding view functions, enabling the application to respond to specific routes with the appropriate content or action.
from django.urls import path
  from . import views

  urlpatterns = [
      path('', views.dashboard, name='dashboard'),

      # Project URLs
      path('', views.project_list, name='project_list'),
      path('project//', views.project_detail, name='project_detail'),
      path('project/create/', views.project_create, name='project_create'),

      # Sprint URLs
      path('sprints/', views.sprint_list, name='sprint_list'),
      path('sprint//', views.sprint_detail, name='sprint_detail'),
      path('sprint/create/', views.sprint_create, name='sprint_create'),
  ]
Step 10: Testing the Django Application
Now it is time to test our newly created Django Application. If you want to run the server at the localhost and port #8000, you will need to execute the following command:
python manage.py runserver
If you want to accessible over the internet, you will need to add the IP Address to your settings files. Open up project_manager/settings.py using the following command:
nano project_manager/settings.py
Now add your IP address (let's assume it is a.b.c.d) to ALLOWED_HOSTS as shown below:
ALLOWED_HOSTS = ['a.b.c.d']
Now start the server using the following commmand:
python3 manage.py runserver 0.0.0.0:80
Open up your favorite web browser and visit http://<YOUR_IP>/project/create and you will be redirected to the following page:
Similarly Open up your favorite web browser and visit http://<YOUR_IP>/sprints and you will be redirected to the following page: